EURUSD turned bearish after the FOMC release and dropped toward the 1.0855 area.
The pair reached its lowest level since Friday. Traders then shifted focus to upcoming US labor market data and short-term dollar strength.
The main view was bearish after EURUSD reacted from demand, failed to build bullish structure, and broke the recent low.
EURUSD Main Outlook
EURUSD came under pressure after the FOMC release. Price moved down to 1.0855 and created a bearish tone before the Asian session.
In the previous forecast, the expected bearish movement was toward the next two target zones. Price followed that view and reached those areas.
After that move, EURUSD reacted from the demand zone. However, the reaction was not strong enough to create a new bullish structure.
Instead, price moved lower and broke the recent low. That break kept the bearish view active.
EURUSD Daily Time Frame
On the daily chart, EURUSD showed clear downside pressure.
Price broke the recent swing point on the left side of the chart. This suggests that sellers were still active.
The pair was also moving closer to an extreme demand zone. This area needed close attention because buyers could react from there.
A strong reaction from demand could slow the bearish move. A clean break below demand could support further downside.
- Current tone: Bearish after the FOMC reaction.
- Important break: Recent swing low was broken.
- Key area: Extreme demand zone on the daily chart.
- Main risk: Price may react from demand before continuing lower.
- Confirmation needed: Wait for lower-timeframe structure before entry.
Why FOMC Matters for EURUSD
FOMC events can move EURUSD quickly because they affect the US dollar.
A hawkish Federal Reserve tone can strengthen the dollar. That usually puts pressure on EURUSD.
A softer Fed tone can weaken the dollar. That can support EURUSD if buyers also defend key structure.
Traders who want to understand this better can read our guide on how interest rates affect forex trading.
EURUSD 1-Hour Micro Structure
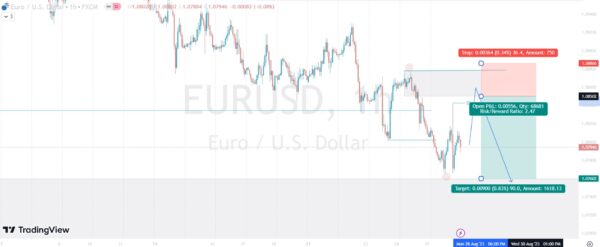
The 1-hour chart showed the micro structure more clearly.
EURUSD broke the recent low and continued moving lower. This confirmed short-term bearish pressure.
The chart also showed a recent swing high and swing low. The swing high could act as a liquidity area.
A supply zone was also visible above the current price. Price could retrace into this zone before continuing lower.
The supply zone was the key area to watch. A reaction from that zone could support the next bearish move.
Supply Zone and Liquidity View
The supply zone was important because sellers may defend that area.
If EURUSD retraces into the supply zone and rejects, the bearish plan can remain valid.
The swing high above the zone can also attract liquidity. Price may test that area before sellers return.
This is why traders should avoid selling too early. A better setup can form after price reaches the supply zone and confirms rejection.
Demand Zone Risk
The daily chart showed price approaching an extreme demand zone.
That matters because demand zones can create sharp reactions. Selling directly into demand can carry extra risk.
For that reason, any short setup needed more confirmation. The trade should not be based only on bearish bias.
A clean bearish setup needs a supply reaction, structure confirmation, and a clear invalidation level.
EURUSD Trading Plan
The trading plan was to wait for EURUSD to retrace into the supply zone.
If price rejected from that area, a short setup could be considered. The target would be the next downside area or the demand zone.
If EURUSD broke the swing high, the bearish setup would become weaker. In that case, the bias could shift from bearish to bullish.
- Preferred setup: Wait for price to retest the supply zone.
- Entry trigger: Bearish confirmation from the zone.
- Target logic: Downside liquidity and demand zone.
- Invalidation: Break above the swing high.
- Risk rule: Do not sell directly into demand without confirmation.
Traders who want structured trade ideas with planned entry, stop loss, take profit, and trade-management updates can learn more about our forex signals service.
Risk Management View
EURUSD was bearish, but risk still needed control.
The market was close to a daily demand zone. That means a short setup needed careful timing.
A trader should define the stop loss before entry. The stop should sit beyond the invalidation area, not at a random price.
A clear target is also needed. The target should match nearby liquidity, demand, or structure.
For deeper risk planning, traders can review our guide on stop loss, take profit, and trailing stop.
A bearish setup can still fail. The trade plan must define where the idea is wrong before the trade is placed.
Final Thoughts
EURUSD showed bearish pressure after the FOMC release.
Price broke the recent low and moved toward an extreme demand zone. This supported the bearish view, but it also created risk for late sellers.
The better plan was to wait for price to retrace into the 1-hour supply zone. If sellers confirmed from that area, the short setup could remain valid.
If price broke the swing high, the bearish bias would weaken. Traders should then wait for new structure before planning the next trade.
Editorial Note: This post was prepared as a PreferForex EURUSD technical analysis. It explains the FOMC reaction, bearish structure, daily demand zone, 1-hour supply zone, invalidation level, and risk-focused trading plan.
Risk Disclaimer: Forex trading involves risk and can result in financial loss. This post is for educational and informational purposes only and does not constitute financial advice, investment advice, or a guarantee of trading results. Always trade with proper risk management.