
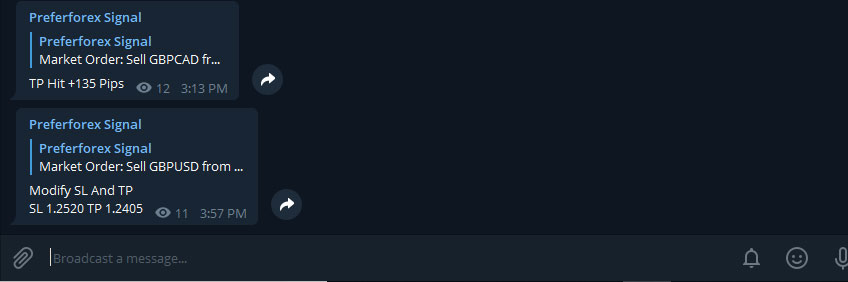
GBPCAD Trade Snapshot
- Currency Pair: GBPCAD.lmx
- Trade Direction: Sell
- Timeframe Reviewed: H1
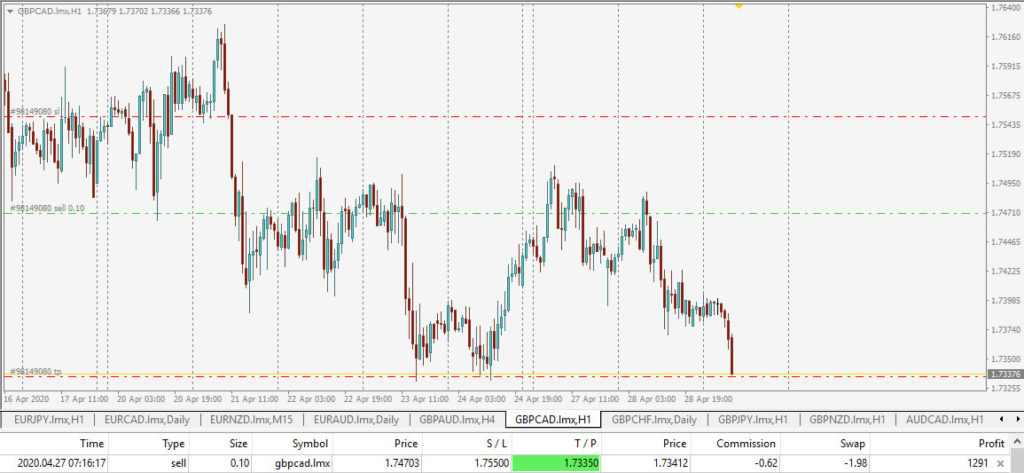
- Entry Price: 1.74703
- Stop Loss: 1.75500
- Take Profit: 1.73350
- Result: TP hit for about +135 pips
- Lot Size Shown: 0.10
- Trade Style: SMC order-flow sell setup
Pre-Trade Market Context
Before the sell setup reached target, GBPCAD had already moved into a higher area where buyers were no longer showing clean continuation. Price pushed upward, but the upper zone did not hold as a strong bullish continuation point. This mattered because a top-side failure can become useful in SMC analysis. When price moves into a higher liquidity area and then rejects, it often shows that buy-side liquidity has been taken before sellers start to control the next move. After the upper reaction, GBPCAD started to shift lower. The bearish candles and lower continuation gave the setup a cleaner order-flow structure for a short trade.SMC View: Top-Side Rejection
The main bearish clue came from the top-side rejection. GBPCAD moved into a higher price area, failed to sustain the move, and then started trading lower from that zone. A rejection from the top is not enough by itself. The important part is what happens after price rejects. In this setup, the market continued lower and respected the bearish direction, which supported the sell idea.The key bearish sequence was top-side rejection, bearish order-flow shift, and continuation toward lower-side liquidity.
Bearish Order Flow Shift
After price rejected the higher area, GBPCAD started forming bearish order flow. Instead of building a clean bullish continuation, price moved lower and began targeting the lower side of the structure. This type of setup fits a short continuation model. The sell idea becomes stronger when price fails at the top, breaks lower, and then continues toward a logical downside target. The trade was not based on selling randomly. It had a defined entry, a stop-loss level above the rejection area, and a take-profit target below the market.Why the Sell Entry at 1.74703 Made Sense
The sell entry near 1.74703 made sense because price had already shown weakness from the higher area. After the top-side reaction, the market started moving lower and gave a cleaner bearish continuation structure. The entry had three useful conditions:- Top-side rejection: Price failed to continue higher from the upper area.
- Bearish order flow: The market started moving lower after the rejection.
- Downside target: The 1.73350 area gave the trade a clear take-profit level.
Why the Stop Loss Was Placed at 1.75500
The stop loss at 1.75500 protected the trade above the higher rejection area. This level worked as the invalidation point for the sell idea. If GBPCAD had moved above 1.75500 and held higher, the bearish setup would have weakened. That would have shown that sellers were not strong enough to continue the move lower. This is why stop-loss placement matters. A trade should not only show direction. It should also show where the trade idea becomes wrong.Take-Profit Target Near 1.73350
The take-profit level near 1.73350 gave the setup a clear downside objective. After price rejected the top and shifted bearish, the lower area became the logical target for the move. In smart money and order-flow trading, price often moves from one liquidity area to another. In this setup, the market rejected the higher area and then moved toward lower-side liquidity. The result confirmed the trade plan because price moved into the target zone and the signal update showed the take profit was hit for about +135 pips.Profit Review: About +135 Pips
The trade moved from the sell entry near 1.74703 toward the take-profit area near 1.73350. That created a planned downside move of about +135 pips. This was a strong result because the trade had a clear bearish structure before the target was reached. The setup combined top-side rejection, order-flow shift, defined invalidation, and a realistic downside target.The trade worked because the sell entry, stop-loss placement, and target were connected to market structure instead of emotion.
What This GBPCAD Sell Setup Shows
This GBPCAD trade shows why forex signals should be reviewed by structure, not only by the final profit. A good trade needs a reason before the result appears.- GBPCAD rejected from a higher price area.
- Bearish order flow developed after the top-side reaction.
- The sell entry was planned near 1.74703.
- The stop loss was placed at 1.75500 as the invalidation level.
- The take-profit target was placed near 1.73350.
- The trade reached target for about +135 pips.
Final PreferForex Outlook
This GBPCAD sell setup was a strong example of bearish order-flow trading from the top. Price rejected the higher area, shifted lower, and then moved toward the planned take-profit zone. The trade reached about +135 pips, but the real value of this review is the process behind the result. A professional trade idea should include entry logic, stop-loss invalidation, target planning, and risk awareness. This type of review helps traders understand how a structured forex signal works from planning to outcome, instead of focusing only on the profit screenshot.Editorial Note: This GBPCAD trade review is based on the original signal screenshot and visible H1 chart structure. The analysis explains the setup using top-side rejection, bearish order flow, stop-loss placement, target planning, and post-trade review.
Risk Disclaimer: Forex trading involves risk and can result in financial loss, especially when leverage is used. This trade review is for educational purposes only and does not constitute financial advice, investment advice, or a guarantee of future trading results. Past performance does not guarantee future results.