AUDUSD Market Snapshot
| Current area: | 0.7159 |
| Bias: | Bullish while POI holds |
| Key demand POI: | 0.7108 – 0.7130 |
| Liquidity sweep: | Below the recent internal low near 0.7140 |
| First upside target: | 0.7215 – 0.7220 |
| Main liquidity target: | 0.7260 – 0.7280 |
| Invalidation: | Clean break below the marked demand POI |
AUDUSD Analysis Today: Key Market View
AUDUSD is showing a clean order-flow reaction after price swept sell-side liquidity and respected the marked demand area. Before this pullback, the price broke above the previous structure high, confirming a bullish break of the structure. After the bullish BOS, the market did not continue straight upward. Instead, price returned lower, swept liquidity below the recent internal low, and tapped into the demand POI. This kind of movement is common in order-flow trading because price often grabs liquidity before making the next directional move. The current reaction keeps the bullish scenario active, but buyers still need to defend the POI. As long as AUDUSD holds above the swept liquidity area, the next likely draw remains the upside liquidity above the recent highs.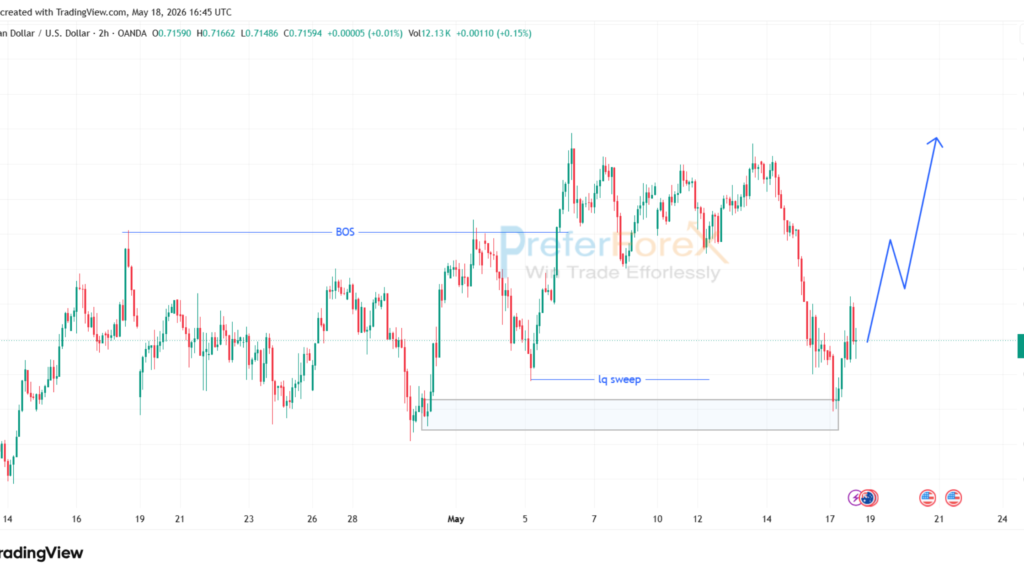
AUDUSD 2H Technical Analysis
From the 2H chart, AUDUSD has three important technical points. First, price created a bullish break of structure above the previous high. This confirmed that buyers had taken control of the short-term structure. Second, price pulled back into the lower part of the range and swept sell-side liquidity below the recent internal low. This liquidity sweep helped clear short-term sellers before the bullish reaction started. Third, price reacted from the marked demand POI between roughly: 0.7108 – 0.7130 This is the main reaction zone for buyers. If price continues to hold this area, AUDUSD can build a higher low and continue toward the next upside liquidity levels.Liquidity and POI View
The main liquidity sweep happened below the internal low near the 0.7140 area. Price moved below that level, tapped into the grey demand POI, and then started to recover. This sweep is important because many short-term traders place stops below recent lows. Once that liquidity is taken, the market often becomes cleaner for a reversal or continuation move. The first upside reaction area sits near 0.7215–0.7220. If AUDUSD breaks and holds above that area, the next major buy-side liquidity target remains around 0.7260–0.7280.AUDUSD Bullish Scenario
The preferred AUDUSD forecast remains bullish while price holds above the marked demand POI. For the bullish setup, AUDUSD needs to: Hold above the swept liquidity area → form a higher low → continue toward 0.7215–0.7220 → break higher toward 0.7260–0.7280. This setup follows a clean order-flow model: bullish structure, liquidity sweep, POI reaction, and continuation toward buy-side liquidity. A strong reaction from the POI can show that sellers were used to push prices into liquidity while buyers defended the discount area for the next bullish leg.Bearish Risk and Invalidation Level
The bullish idea becomes weak if AUDUSD fails to hold the marked demand zone and breaks below the swept liquidity area again. A clean break below the 0.7108–0.7130 POI can open the door for deeper consolidation or a move toward lower liquidity. In that case, buyers should wait for a fresh structure shift before considering another bullish setup. Until that happens, the current order-flow structure still supports a bullish continuation scenario while the POI remains protected.AUDUSD Fundamental Overview Today
AUDUSD remains sensitive to both US dollar strength and Australian dollar sentiment. When the US dollar gains momentum, AUDUSD often faces pressure because the pair is priced against the dollar. However, the current setup is mainly technical. The chart shows a clear liquidity sweep and demand reaction, which keeps the bullish scenario valid as long as the price holds the POI. Traders should still watch upcoming US data, Federal Reserve commentary, and broader risk sentiment. Stronger US data can support the dollar and pressure AUDUSD lower. Softer US data or improved risk sentiment can help buyers defend the current demand zone and push the price toward upside liquidity.PreferForex AUDUSD Outlook
AUDUSD is trading at an important 2H decision area after sweeping sell-side liquidity and reacting from the marked demand POI. The bullish break of the structure remains valid, and the current reaction suggests buyers are still active from the lower range. As long as AUDUSD holds the 0.7108–0.7130 POI, the bullish continuation idea remains active. A continued hold above the swept liquidity area can support a move toward 0.7215–0.7220, followed by the main upside liquidity around 0.7260–0.7280.- Bias: Bullish while POI holds
- Current area: 0.7159
- Key POI: 0.7108 – 0.7130
- Liquidity sweep: Below the recent internal low near 0.7140
- First target: 0.7215 – 0.7220
- Main liquidity target: 0.7260 – 0.7280
- Invalidation: Clean break below the marked demand POI
Editorial Note: This analysis is based on technical price structure, liquidity zones, and current market conditions at the time of publication.
Risk Disclaimer: This analysis is for educational purposes only and does not constitute financial advice. Forex trading involves risk, and past analysis does not guarantee future results. Always trade with proper risk management.